Jeria
Annoying main weapon, but high potential.
Author: Flyingfish812
Advice from ☀🐕: I don't recommend playing Jeria at 120 FPS. In the current version, sparrows are relatively scarce. The Vorpal Lance always has attack targets, so overflow issues are unlikely to occur. Delaying energy acquisition is negative for lance ships, especially for Jeria, which has strict operational requirements. However, it doesn't matter much in bullet hell missions, as there is no shortage of lances due to the large number of grazes.
Advice from ☀🐕: I strongly advise against playing Jeria seriously. It will only make you resent the game. You can try using Jeria to get #1 in missions, especially when Proxymar and Kibarrax are on the leaderboard. However, casual players usually don't try to obtain a large number of BOBs. If you want to get one BOB, practicing seriously with those two ships is enough.
Introduction
Jeria, this ship, can be said to evoke both love and hate. We love its explosive potential but hate its controls because they are just so counterintuitive.
The skill of Jeria largely comes from its main weapon. The use of Vorpal Lance, and Reflex EMP are entirely dependent on missions. In other words, how to use the Vorpal Lance and Reflex EMP relies heavily on personal experience, some waves should be dealt with using the Vorpal Lance in one go. In this guide, I will try to explain in as much detail as possible, from a player's perspective, which experiences are very useful. Even for players who have played Jeria for a long time, they cannot guarantee that they can accurately find the optimal solution for every type of mission.
This guide does not differentiate between basic and advanced guide because Jeria is difficult to master and has a high skill ceiling. Each skill requires a lot of practice to become proficient.
The main weapon, the source of all evil
The main weapon is the soul of Jeria, determining its potential. Precise control of the main weapon is of great help in mastering this ship successfully.
First, let's analyze some characteristics of the main weapon. Jeria's main weapon alternately fires left and right, with a 0.4-second interval. Each shot of the main weapon inflicts 11.7 impact damage and 2 area damage to invaders. In addition, Jeria's main weapon slows down and lingers after traveling a certain distance until it disappears. Therefore, camping at the bottom of the screen is usually not advisable because in this situation your main weapon cannot hit distant invaders. In this sense, Jeria also has a certain close-combat component.
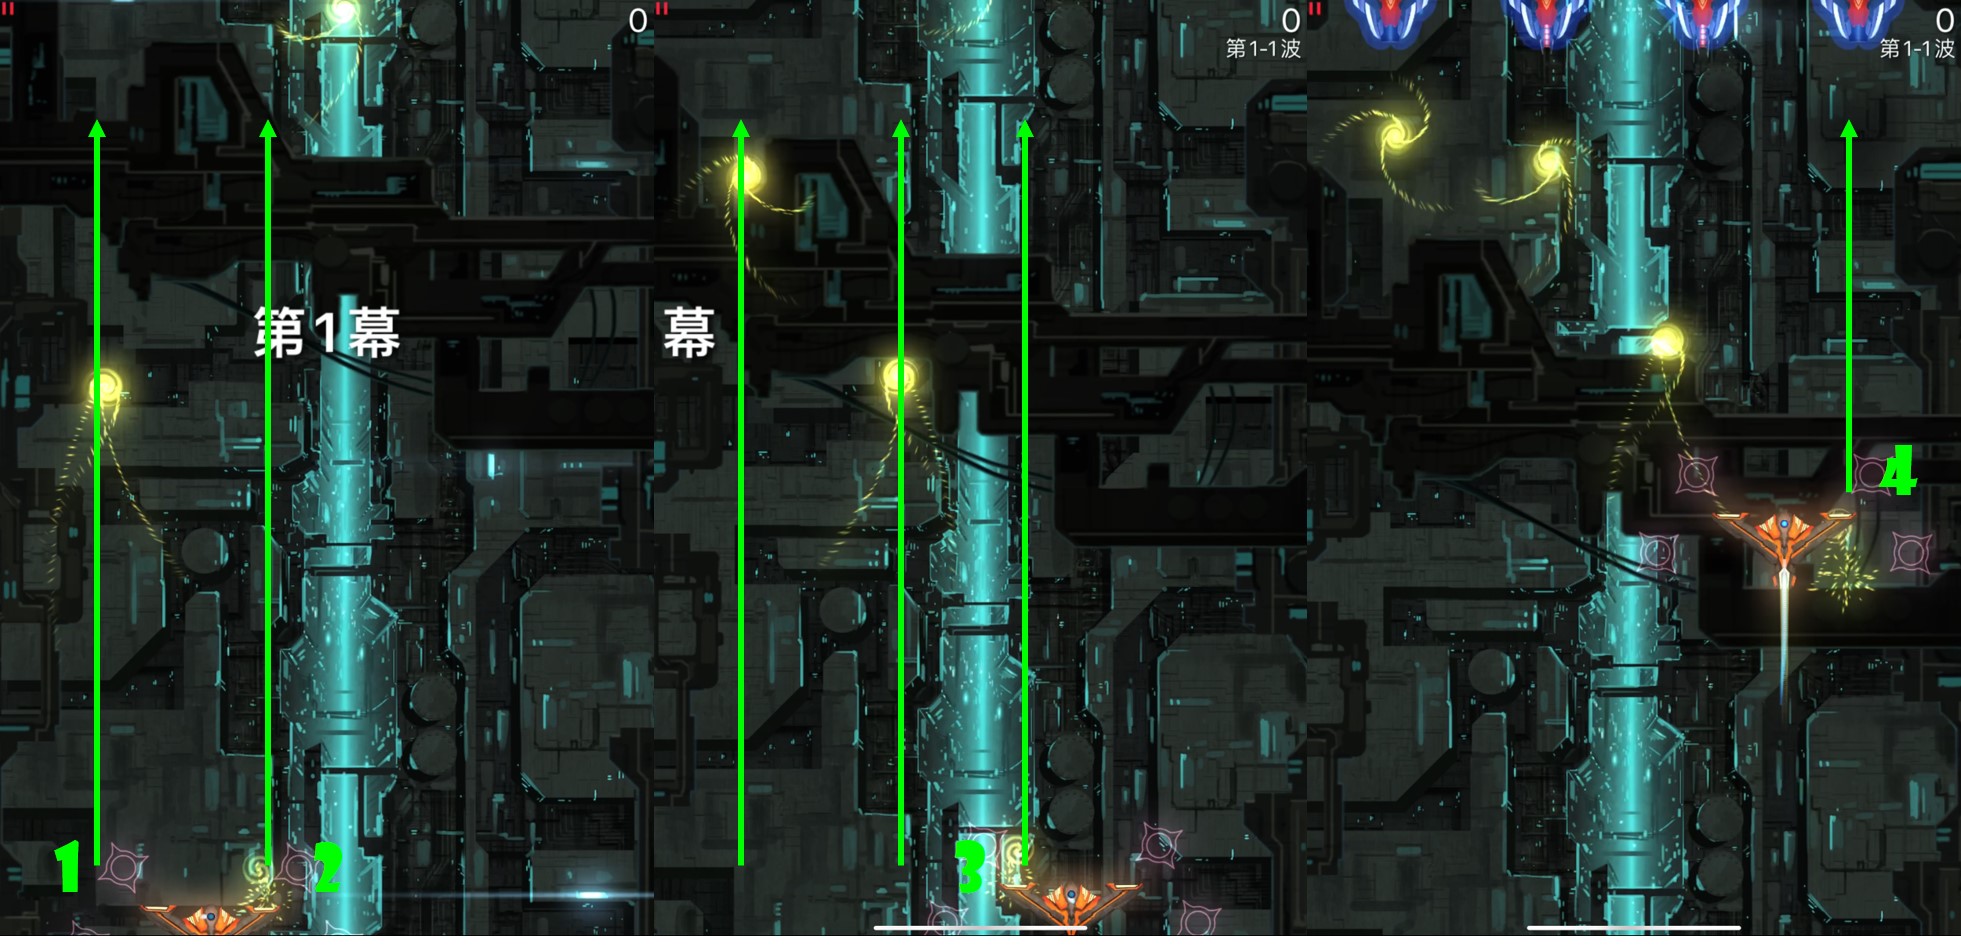
In the figure below, we show the distance the Jeria main weapon can fly in each act. It can be noted that this distance decreases after each act. Therefore, you need to constantly pay attention to the distance from invaders.
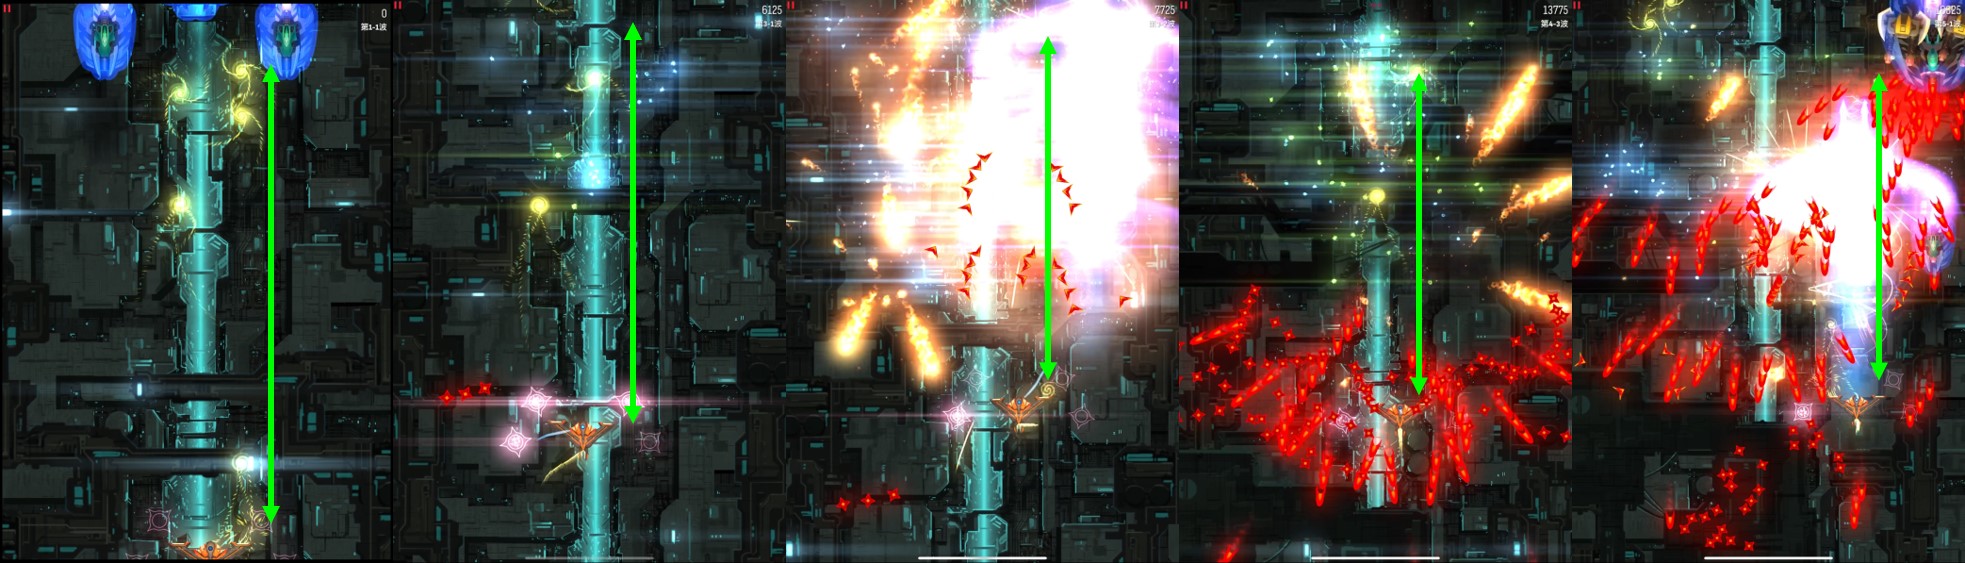
Furthermore, Jeria's main weapon does not fly very fast, which means that invaders may escape before the main weapon arrives, making it impossible to hit them.
Therefore, prefire becomes a major focus skill for Jeria. In the process of practicing the main weapon, you need to form muscle memory through extensive practice, not only mastering the control of the main weapon's flight distance but also pursuing accurate firing of the main weapon.
Prefire
In the first act, the invader density is low, and energy is scarce. Except for a wave of invaders that can be eliminated using Reflex EMP, you almost need to rely on the main weapon to complete all other waves. In fact, starting your attack after the invader is in position will lead to chaos. Firstly, because the 0.4-second interval still demands precise operation, and secondly, because missing a shot requires waiting for another 0.8 seconds for the next round of main weapon fire (it's difficult for most people to train the awareness to switch to aiming with the right weapon immediately after missing with the left, so it's actually more efficient to aim on one side).
In this situation, you must fully utilize the lingering characteristics of the main weapon to enhance your attacking ability. Specifically, anticipate the position where the invader will be and find the corresponding firing position for the main weapon. By doing so, you can damage the invader the moment it is in position. At any given moment, there can be a maximum of 6 main weapon shots on the screen, so you need to consider where these shots should be fired.
When a mission starts, the first shot of the main weapon is always from the right side, but we usually leave this shot empty because from the moment Jeria enters the act until the invader is in position, you can fire a total of 7 main weapon shots. Since only 6 shots can be retained on the field, the first shot of the main weapon serves no purpose and can be left empty. In the following demonstration, when we refer to the first shot, it usually refers to the shot after leaving the first shot of the main weapon empty, and so on.
We use some invader configurations from the first act as a demonstration.
-
4 Sparrows in square
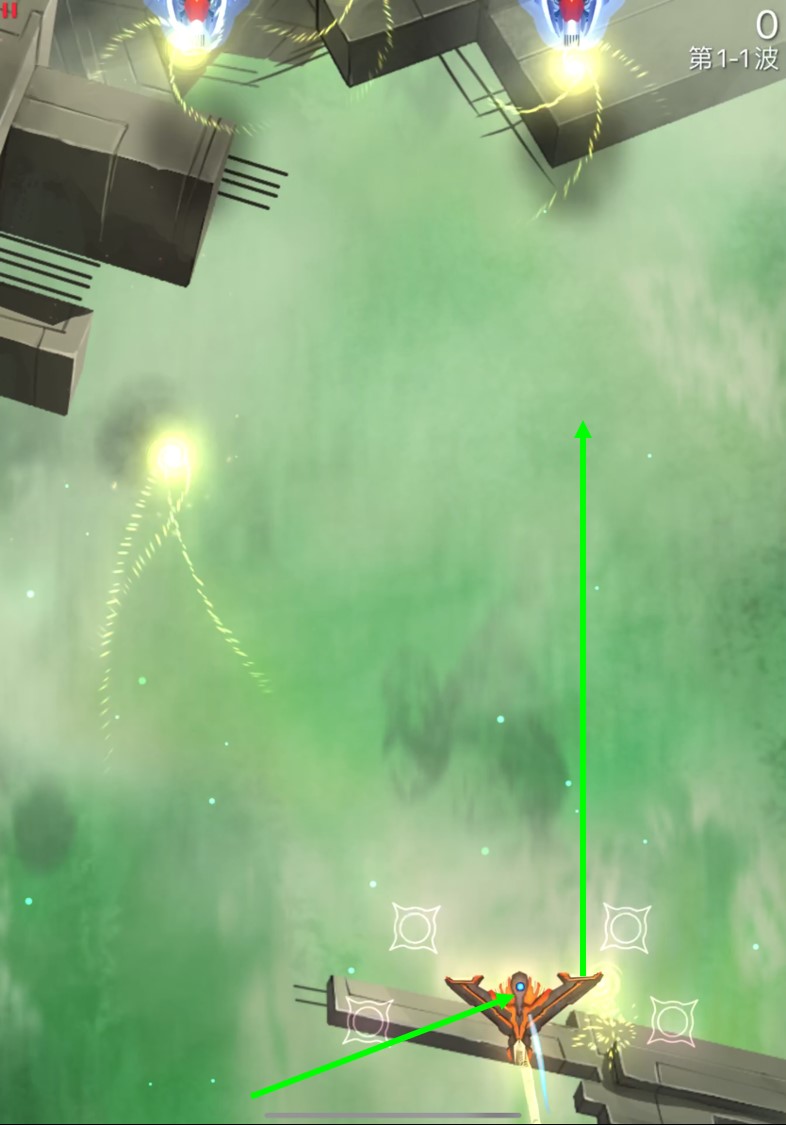
This sparrow formation is one of the most common formations and is one I recommend players to master. At the start, you need to align the left main weapon with the left vertical line of the formation because our goal is to eliminate the sparrows in the left back row first. One detail to note here is that, according to the Jeria main weapon's flying distance described earlier, the prefire position is not at the very bottom but slightly above the bottom:
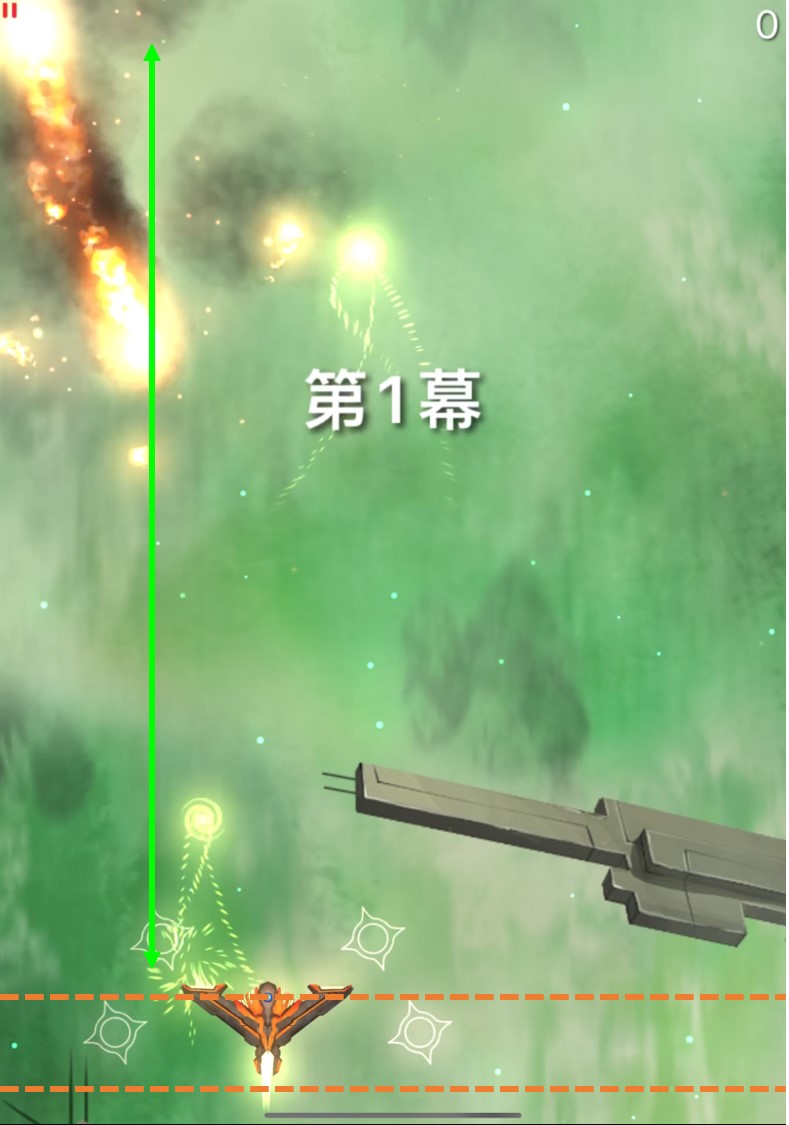
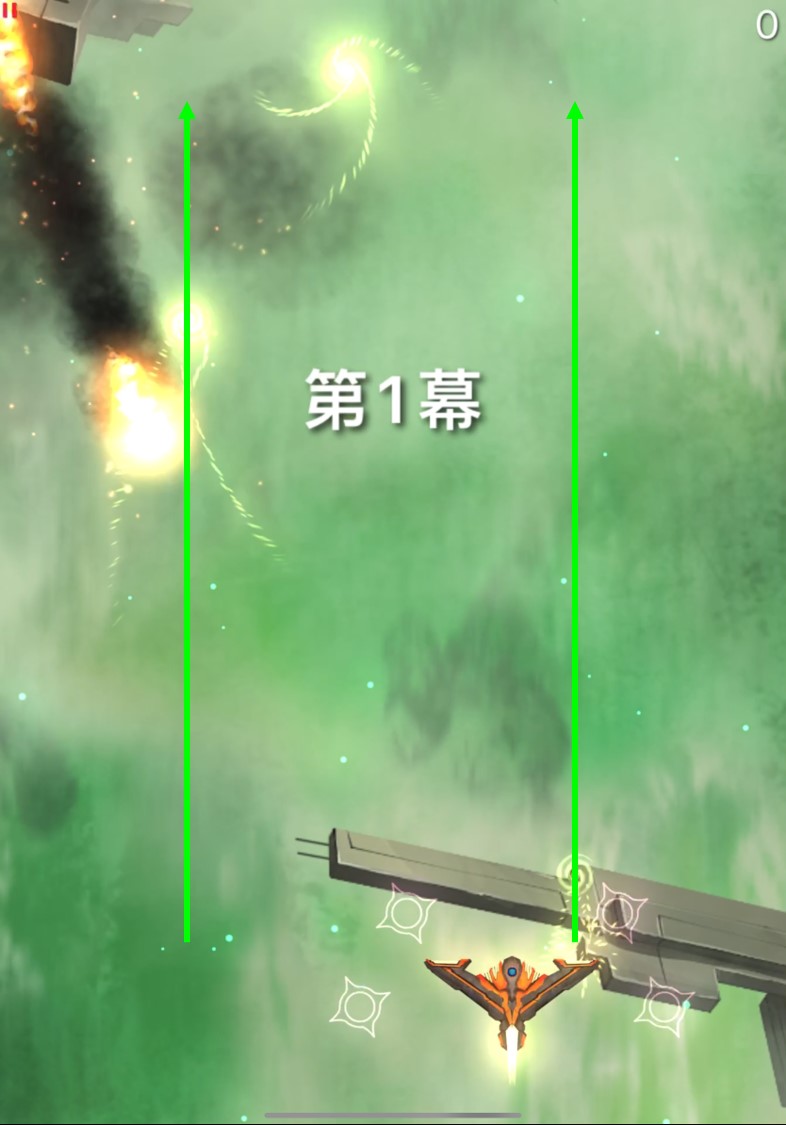
This shot will accurately hit the sparrows in the left back once the invaders are in position. For the sparrows in the right back, we perform the same operation, aligning the right main weapon with the right vertical line and firing the main weapon at the same horizontal position. Note that all of this is done within 0.4 seconds, so practice to get the feel for it:
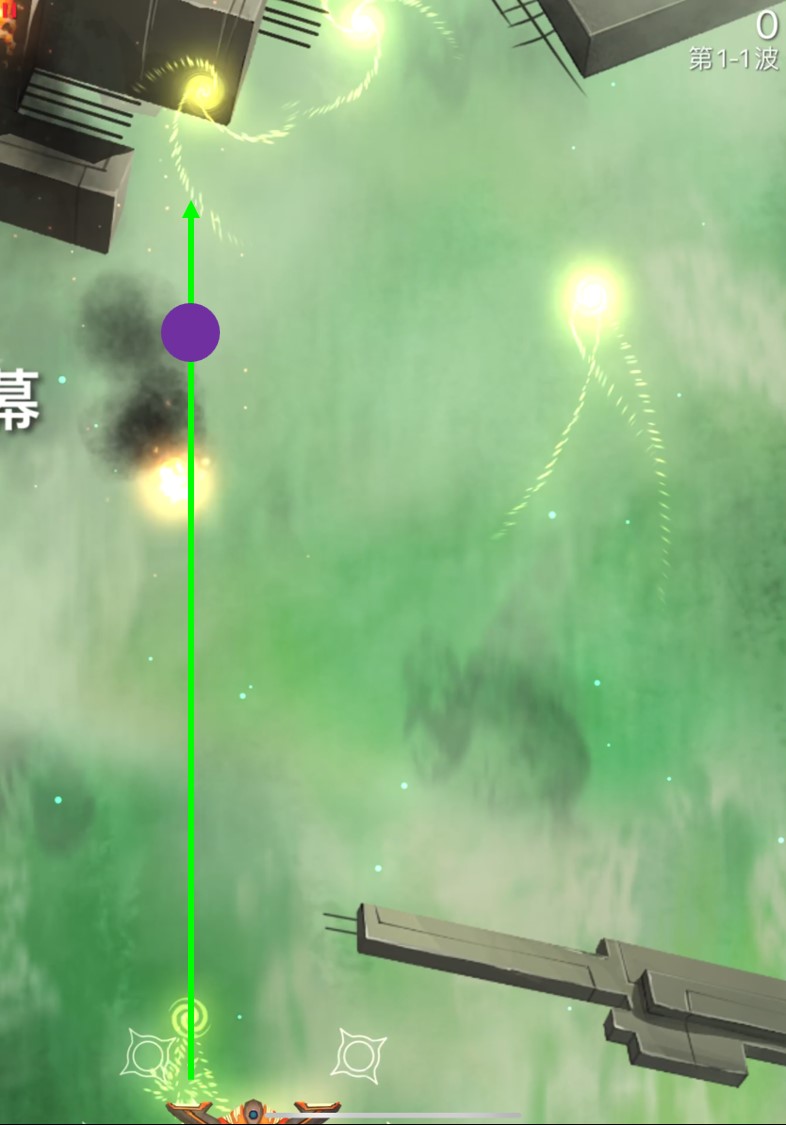
The third shot is a bit different; we will leave it empty. The reason is that even if you pull the ship down to the bottom line, the main weapon's flying distance will still pass over the sparrows in the left front. Therefore, this shot is left empty:
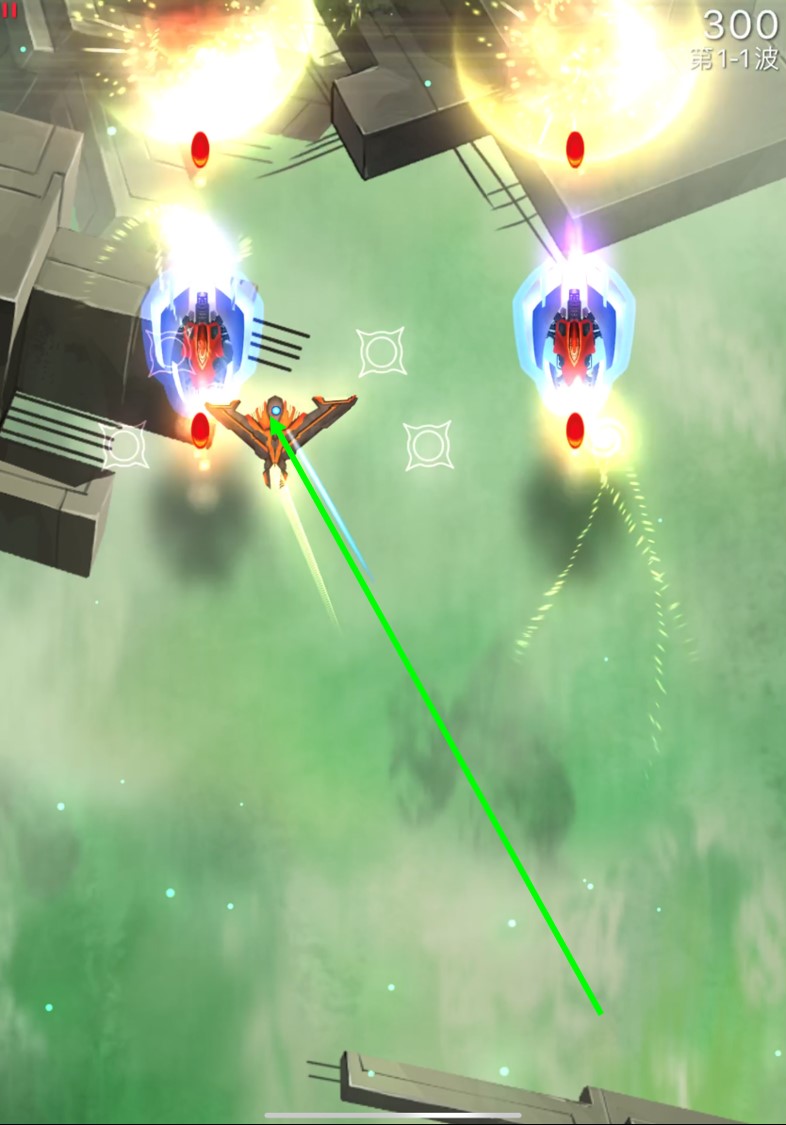
The fourth shot cannot be left empty because it coincides with the time when the sparrow enter. Normally, the sparrows in the right front will collide with your main weapon. So when firing the fourth shot, you need to pull down to the bottom line and fire the main weapon on the right vertical line:
We skipped the sparrow in the left front earlier, but now we need to reconsider it. At this point, the sparrows are in position, and your next shot is from the left side. To avoid empty shots caused by the main weapon's flight, you need to dive your left main weapon onto that sparrow and hit it:
Now, you have learned how to solve this configuration. Still feeling confused? We provide a slow-motion demonstration here. Note that the first shot is left empty, and the following five shots need to accurately eliminate four sparrows:

Let's introduce another special case: starting a new round of the game from a non-first act position. The special thing about this situation is that the map size when entering the first act is still the same as the subsequent acts, which are much larger than the first act. In this case, the third shot that was left empty previously doesn't need to be empty anymore; instead, it should directly target the sparrows on the left side.

-
4 Sparrows in a row
This sparrow formation is also quite common. Unlike the previous one, this time the prefire sequence goes from left to right. The starting position is the leftmost sparrow, and the prefire position is directly at the bottom line of the screen.
Our goal is for each of the first to fourth shots to hit one sparrow. Therefore, you need to decide on an attacking sequence: 1-2-3-4, or 1-4-3-2.
The 1-2-3-4 sequence is relatively simple. After prefire with the first main weapon, slightly offset to the right to fire the second main weapon. The position for the third main weapon requires you to move the ship significantly to the right before prefire.
The 1-4-3-2 sequence is more complex. Since the prefire position for the second main weapon is at the bottom right corner of the screen, you need to move the ship significantly to the right. For the third shot, you need to move back to the left for prefire. One of the benefits of this sequence is that the prefire order is symmetrical, which feels better, and secondly, there is a chance for the third sparrow to be directly eliminated by the splash damage from both the left and right main weapons (in the case of a 2.5x damage boost from shields, 2 shield points only require 0.8 damage to break through, so the sparrow actually only needs 3.8 damage, which is exactly the damage from two splash hits).
Let's demonstrate each of the two methods separately.
-
A Raven with 4 Sparrows
The strategy for this configuration follows one principle: prioritize prefire positions for invaders in the back row. For example, if the raven is in the middle, you need to prefire the first shot at the position of the left sparrow and the second shot at the position of the right sparrow. Next, do not prefire at the two sparrows in the front row, but rather aim at the raven for prefire. This is done to avoid the main weapon flying over the sparrows in the front row and resulting in empty shots.
One raven requires two shots to deal with it, while the remaining two sparrows should be tackled by diving to the front row for elimination, also to avoid empty shots.
There are many variations of this, such as the raven being in the back or front, or the raven and two sparrows being in the same row (front or back). The strategies for these situations are similar, all following the simple principle of prioritizing prefire positions for invaders in the back row.
-
2 Ravens
No matter which wave you encounter this configuration, your strategy should never be using Reflex EMP or Vorpal Lance. Firstly, because 2 ravens can be killed with just four shots, and the aiming difficulty for ravens is much lower than that for sparrows. Secondly, even if you use a skill like Reflex EMP, you still need additional main weapon shots to eliminate the invaders, which is a waste of valuable skill cooldown.
If you encounter this configuration in the first wave, you only need to prefire two shots on one side. For the remaining raven, we will choose to dive and eliminate.
-
Extra: Continuous Prefire
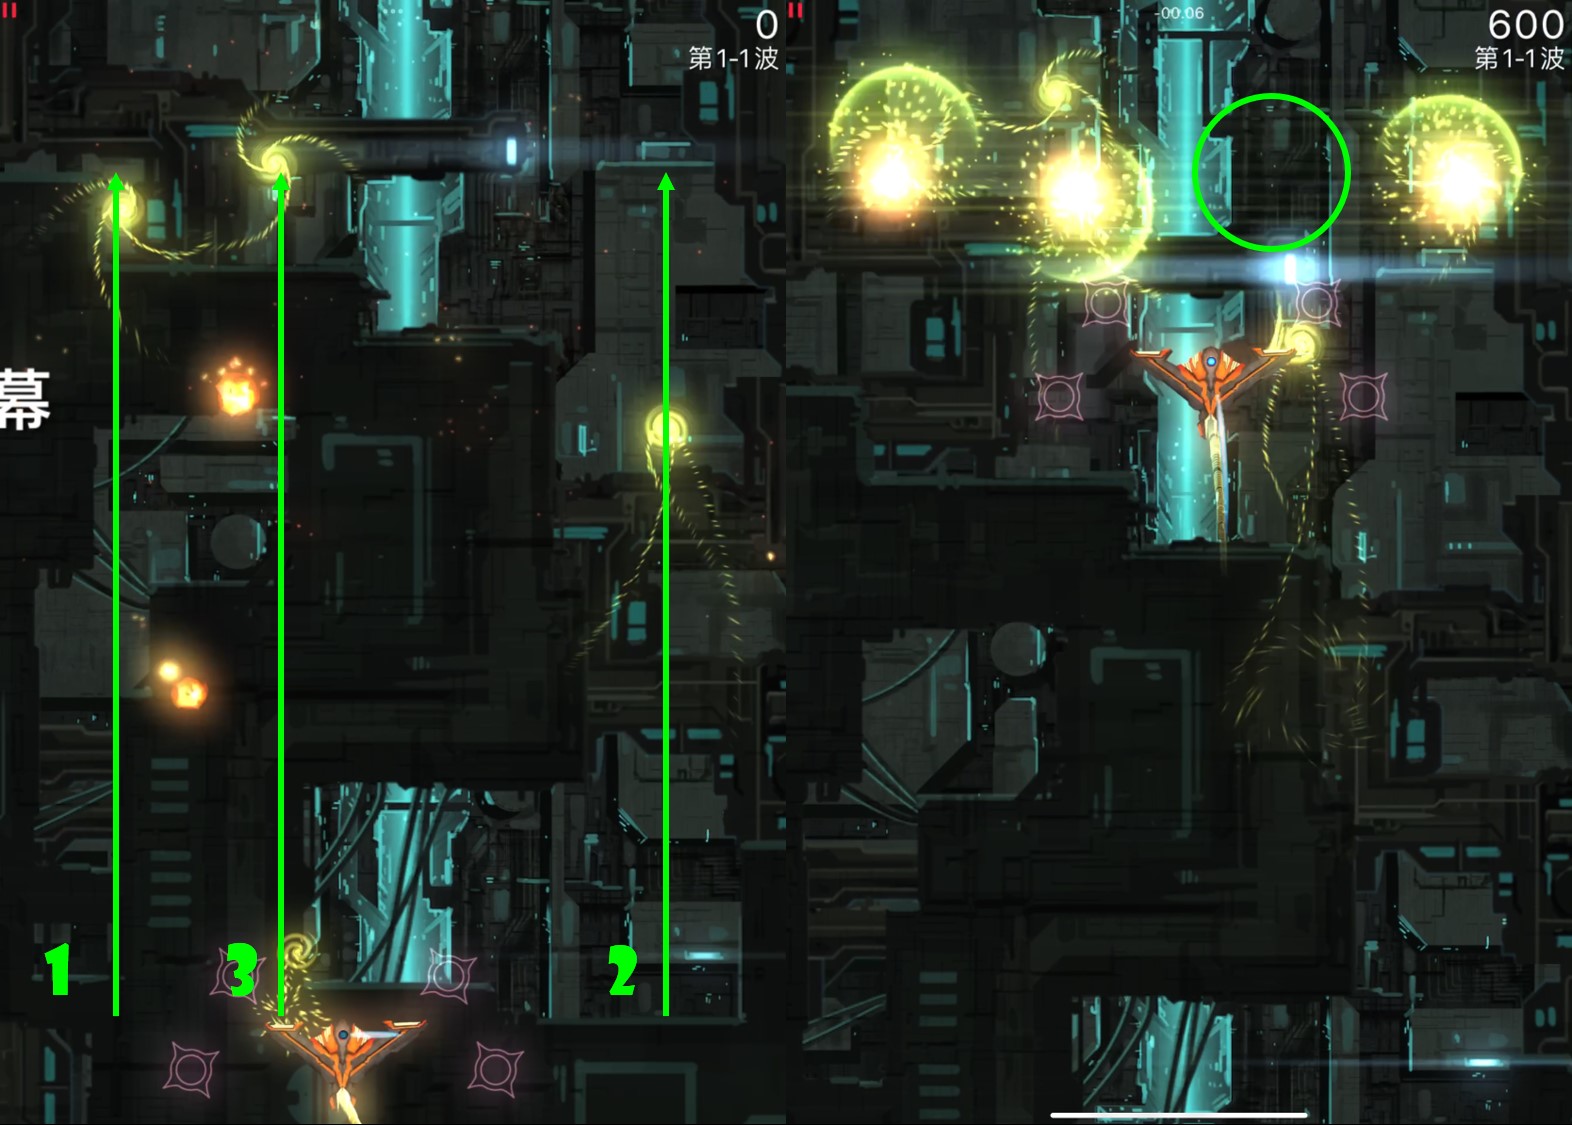
The prefire technique can lead to many new gameplay strategies, and it's impossible to list and explain all possible configurations. When you're in the game, remember one principle: the moment the last shot of the previous wave ends is the best time to prefire for the next wave.
For example, in the community mission demonstration below, act 1 only has a small number of invader combinations that can be instantly eliminated using the prefire technique. When the invaders of the previous wave are killed, immediately prefire for the next wave to form a cycle:
In summary, the prefire technique can be considered the essence of Jeria's main weapon. Its role is to maximize the damage of the main weapon while avoiding wasting damage due to the chaotic movement of invaderes. When you need to prefire, always prioritize targeting invaders in the back row. Prefire technique not only makes it easy for you to pass through the early waves but also provides significant assistance in the later waves. Generally, the moment the last shot of the previous wave is fired is the best time for you to prefire for the next wave.
Vorpal Lance + Reflex EMP
We make the two skills together, because they are usually paired with the prefire skill.
Most of the time, the combination of these skills is slowly cultivated by players based on their feelings, so it's not to say that a certain configuration needs to adopt such techniques to be the best solution. However, within these various "feelings", there are still some patterns to follow. In this section, the editor hopes that after players have watched the listed technique illustrations, you will intentionally apply these techniques in missions. Once your gaming awareness is trained to a certain level, these skills will naturally be applied through muscle memory, reaching a state where you can score high based on intuition.
Attention, players!
-
Don't waste your mains before Vorpal Lance

This technique emphasizes that during the transition between two waves, it's usually possible to fire the main weapon twice, though most of the time they would be wasted. However, in act 1 and 2, as shown in the inverted triangle formation above, you can prefire to use those two shots to eliminate one of the ravens. Then, while the remaining two ravens have not moved yet, quickly penetrate them with a Vorpal Lance.
-
Prefire enough in wave 1 of each act
Similar to the prefire at the start of the game, this is another extension of the prefire technique. In the act 1, where there are fewer invaders, players can fully develop their awareness of prefiring. However, starting from act 2, as the density of invaders increases, the accuracy required for prefiring greatly increases. As a result, act 2 often becomes a challenging area for Jeria players. Dealing with these less dense invaders, the Vorpal Lance seems superfluous, and Reflex EMP is not sufficient, leading to a gap in performance during this scene.
The accuracy of the main weapon can become a decisive factor in creating a gap under specific configurations. More accurate main weapon fire, as demonstrated in the illustration above, can save you a Reflex EMP to be used in attacks where it's harder to control the main weapon. It is often said that Jeria's speedrunning lies in the operation of various skills, and more proficient mastery can allow you to more naturally manage the use of each function.
Another reason for this claim is that herons and eagles usually require additional main weapon fire to be eliminated. For example, in the formation shown above, a single Reflex EMP is not enough to eliminate herons, each of which needs an additional three shots from the main weapon or one Vorpal Lance. But if you prefire, the extra four shots from the main weapon can save you a lot of effort. Think about it, if you don't prefire, you would have to compensate with two Vorpal Lances or six shots from the main weapon, sacrificing either time or energy.
-
Vorpal Lance the line-ups
This statement is easy to understand, precisely because it takes into account the characteristics of the Vorpal Lance's straight-line attack. The more invaders there are in a single column, the greater the benefit of the Lance. Therefore, in early attacks, we usually don't use Reflex EMP on vertically aligned invaders. The same principle applies during intense attacks later on; when invaders cluster together, don't hesitate to fire the Lance.
-
REMP the invaders in a row

Clearly, such a configuration is not very friendly to either the main weapon or the Vorpal Lance, but fortunately, we have the Reflex EMP to deal with this situation well. When you see a horizontal row of invaders, especially a row of sparrows, don't hesitate, just rush in and reflect. Of course, it's important to note that prefiring is still very important, whether against herons, shielded ravens, or eagles, it's worth it to prefire before rushing into the invaders to release the Reflex EMP.
-
Operational requirement when you have 3 Lances
During most Jeria missions, you usually only have three Vorpal Lances in your hand, but you need to face a wave of heavy attacks. If you are familiar with the damage of the Vorpal Lance, that is, how many lances each type of invader needs to be destroyed, you will be able to distribute the three lances in your hand better. Typically, herons require two lances, or one lance with a prefire, while eagles require three lances or two lances plus a prefire.
As demonstrated above, many times in dense attacks, there will be two herons, and our goal is mainly focused on them. The typical use of three lances is usually two shots on one side and one shot on the other side. Here are two solutions based on personal habits:
- Pre-aim at the position where you need to release the lance, and shoot two lances on this side directly after the invaders are in position, without using the prefire on this side for the herons;
- Prioritize using the prefire to break the shield of the herons on this side, then release only one lance, and quickly move to the other side to use two lances to eliminate the remaining herons.
The difference between these two solutions is tiny, and you can choose one based on your habits and proficiency. Forcing yourself to adapt to the other playstyle might actually slow you down.
When there is only one eagle in the back row, all lances must hit them, otherwise, after you eliminate the herons, you will still have to deal with the eagle. This principle is straightforward. However, when there are two eagles in the back row, it's a bit different. Since the damage required for eagles is much higher than for herons, we usually prioritize attacks against the eagles. At this time, Reflex EMP plays an excellent auxiliary role.
- After using Reflex EMP, use one lance on the herons on each side. At this point, each heron only needs one shot to be killed, and the remaining lance can be left for the eagle. Depending on the situation, you can wait until the eagles gather before shooting the last lance, or aim it at the one side that hasn't had a heavy output from the main weapon yet;
- If unfortunately, Reflex EMP is on cooldown, then you must try to break the shields of the two eagles by pre-firing in the middle. Then use two lances, only two, to eliminate the two eagles. The herons in the front row can be dealt with using 4-5 shots of the main weapon or main weapon plus the remaining lance;
- If you are extremely lucky and all invaders converge in the middle, just throw all three lances in the middle without hesitation. This situation is relatively rare and requires players to be able to adapt on the fly.
-
Lance sweep is never a waste
This technique is aimed at situations where all sorts of messy invaders are present in this wave. In such cases, carefully considering how to use Vorpal Lances, Reflex EMP, and the main weapon may lead to an optimal solution, but it's often difficult to achieve.
The basic principle of using 4 Vorpal Lances for lance sweep is to observe the approximate distribution of the invaders and throw the lances where the invaders overlap the most. The position selection typically includes:
- Positions where the edges of herons and ravens overlap;
- Positions where small invaders overlap with eagles.
Its method of throwing is quite rough, but you also need to remember the fact that herons require two lances (if pre-firing, herons require 4 shots of the main weapon, and when using Vorpal Lances directly, you still need to add 3 shots of the main weapon). Therefore, aim at the sides of the herons and eliminate this wave completely. Of course, if you can prefire, prioritizing breaking the shields of the eagles will make the effect more pronounced.
Generally, the Twin Lance APEX is more suitable for completing this skill. If you find that this mission requires you to use Vorpal Lances to sweep the map, give it a try. (This principle only applies to shield missions; for unprotected missions, always use the high-damage APEX for Reflex EMP, remember.)
-
4 eagles? Everyone has headache
This is a rather heavy 4+2 setup: 4 eagles lined up in pairs, along with 2 herons. Generally, there are two main solutions:
- Having 4 Vorpal Lances, use two lances on each side, supplemented with Reflex EMP to eliminate all invaders;
- Having 3 lances, throw them at the middle while the eagles are still together.
The first method is more suitable for unprotected missions, as the eagles have thicker shields in shield missions, requiring a considerable amount of main weapon shots in addition to prefire to eliminate all eagles. The second method is more common, but it also requires all lances to hit each eagle, with a high element of luck. This approach can also be followed up with a Reflex EMP for extra damage, but the remaining two herons will need to be dealt with using the main weapon.
This formation can easily widen the gap between Jeria players. More accurately, players with better luck can achieve higher scores. The editor suggests that players should not overly pursue this kind of luck, as it can greatly drain your energy while making you angry.
As demonstrated in the illustration below, even in the scenario where all three eagles converge, the remaining one eagle can prevent you from achieving the optimal solution. Therefore, adaptability is more important than relying solely on summarized experience.
-
Bosses are just with more HP
There's no skill involved when dealing with the Condor and the Roc. Due to their high health, it requires a considerable amount of main weapon shots to completely kill them no matter how you calculate the damage. From this perspective, dealing with these heavy invaders is actually the simplest: prioritize using the main weapon to break the shield, then use Vorpal Lances to pop the small turrets that cannot be grazed, and occasionally use Reflex EMP to supplement damage. Here are some summarized empirical data:
- The shielded Condor requires 7 shots of the main weapon to break the shield, while the Roc requires 11 shots;
- The shielded Condor can have up to 2 Reflex EMP, while the Roc can have 3 (subject to cooldown after killing them).
Additionally, since they are essentially killed with the main weapon, it means you have opportunity to prefire for the next wave, so don't forget this point.
Conclusion
Jeria is an extremely skill-dependent ship, and most of the gameplay introduced here is based on players' extensive exploration and summarization of general strategies. In missions, you not only need to fully understand the gameplay and mechanics of this ship but also need to integrate the relevant techniques of other ships (such as grazing), enabling you to adapt to different situations and make better decisions. These strategies are not the only ones; depending on the mission, there may be situations where you need to completely go against the principles mentioned above.
There is a saying that 10k flights are enough for mastering other ships, while for Jeria it's just the beginning. If you are willing to practice with Jeria, be prepared for a large amount of gameplay.