
Barrier

Deploy a barrier to block bullets and lasers.

A pre-emptive usage Aura. Only recommended after a player has mastered the basics of understanding how bullets and lasers work. Surprisingly very effective if wielded very well.

The details of this skill are listed as follows:

Level12345Ultimate
Max Barrier Strength (%)100126150176200200
Max Radius250~~~~~
  • Ultimate: Adds an additional Inner Lining, a smaller barrier inside of the outer barrier that has approximately a maximum of 100% strength. However, the inner lining will fade together with the outer lining if the outer lining starts fading first.
  • Score: 6.00 / 10
  • Useful Levels: 1, (sometimes 5), Ult
  • Priority Level: 2 / 8
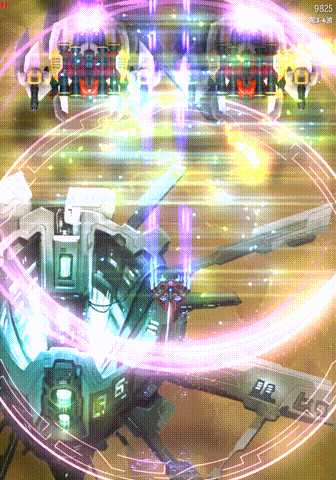
  • Illustration:

Comments

  • Editor: You want to use it to block something?
  • ☀🐕: Barrier is too weak of an Aura without a Reflector Apex. Inner Lining should be made to be able to persist if the outer Barrier is destroyed first. And, a durability buff is always welcomed.

Usage

Utilized with extreme precision, Barrier sometimes even triumphs over BEMP at level 1. The smallest barriers block off one full burst of lasers, and is also able to keep bullets off for a reasonable period of time. This is very useful when cutting holes in bullet walls so that you can squeeze your way through the gap made by the barrier. It is not entirely reliable to cut bullet wall holes for sure, but it does help.

Until you reach the ult level, the usage of barrier remains the same. It is basically a tool to cut off bullets to squeeze your way through. However, you will have more leniency in last minute barrier deployments against lasers. Barriers are best deployed as small as possible and around yourself. You can deploy upfield if you find you are in an overflow of particles. However, stacking up multiple barriers (more than 4 is quite excessive already) is generally of not much use. This is because the unfortunate thing about barriers is that their health actually decays over time, so a barrier not taking damage will still fade after a while. This is why it is useless to deploy so many barriers as the old barriers deployed inside of newer barriers will fade without it having its usefulness. You can however, attempt to deploy each subsequent barrier a little backward than the previous one, such that the front barrier is an older one and can be useful against incoming bullets from tracking turrets.

However, when you reach the ult, gameplay changes radically. When you get a large amount of particles for a full size / near full size barrier, you should now deploy your barrier upfield such that it encapsulates the invaders. This allows you to take advantage of the inner lining of barriers as well. This is not true for all barrier ships as some ships do not benefit from the inner lining.

The one important thing about barriers is the Phase Out duration of barriers. No matter the size of the barrier, the Phase Out time of the barrier is constant. Thus, the smallest barriers are very useful for this reason. Deploying upfield to create practically a double barrier drastically improves survivability from the double Phase Out time. Be warned however, that the Phase Out of barriers is unreliable in protecting you from lasers leaking through the barrier, so be prepared to strafe or deploy a small barrier where you are when you see the barriers fading. Also, barriers' biggest weakness is to lasers as they do enormous damage to lasers. Usually one full burst of about 10 lasers is enough to make a barrier start fading.

The gameplay of Barrier for an ult status is generally to deploy a barrier upfield when the following 2 conditions are satisfied. Firstly, it must be sufficiently safe enough to go upfield to do the deployment. Secondly, there must be either slightly less than enough to completely fill the Aura, or only slightly more than enough. If you see that there are too many particles, strategically grab some particles, and head back down to dump a small barrier at the bottom of the field. Try to make that the outer edge of the smaller barrier is not inside the bigger barrier upfield (if any). It is not completely essential though. Then when the opportunity strikes, head back upfield to deploy the full barrier around invaders. Take note that it can take a small fraction of time for you to actually pick up the particles when dashing upfield, so the barrier size may not always be of a size you wish. It is difficult to control this and I suggest you do not fret over this, as a small upfield barrier can also make use of its inner lining.

Always try to keep a small deployable barrier at hand where possible. The more important priority, however, is to make sure that you have at least one barrier deployed at the start of a wave, preferably upfield. If you can afford to spam 2 upfield barriers, do it, even if that leaves you with nearly no Aura remaining. (In the rare case you get enough for a third one though, don't deploy the 3rd one and keep it.) When looking at survivability, it is usually possible to delay the next wave and place at least one upfield barrier. When speedrunning, you would have to find an opportunity near the end of a wave to quickly head upfield to deploy a barrier. Generally, the maximum recommended number of big barriers upfield is 2, since there are 4 layers of barriers to plow through. 2 large barriers and 1 mini one upfield is also generally ok.

The very important about barriers is: Barriers are not tools of defence where you can have your leeway in doing whatever you want downfield and be safe from invader fire. Depending on ship, you should deploy some offensive Zen while the barrier is up, or use the chance to start popping turrets or invaders off. Another thing: Barrier are designed to be destroyed, they are merely a tool for you to buy a bit of time to destroy invaders, and not stay safe forever. Do not be afraid to deploy barriers around yourself, and waste the inner lining. Small barriers around yourself can actually work better than big barriers upfield, even without the use of the inner lining. Such small barriers can still effectively aid the setup of many offensive Zens. The smallest barriers can also be a slightly pre-emptive last defence against a wall of bullets approaching you. Emphasis on pre-emptiveness, as the most last minute barrier won't save you, at least from bullets (but for lasers, absolutely so).

Generally, when deploying an upfield barrier, you want to cover all invaders so that you can safely charge an offensive Zen or do turret popping. However, if there are very deadly turrets on a Vulture behind, especially MIRV Bloomers, spinners and high tier boomerang turrets, it may be beneficial to instead deploy the barrier such it only covers the Vulture turrets, and leave yourself exposed to invader fire below, such that the barrier can block off the more deadly bullets coming from upfield. Barrier positioning does matter in such circumstances.

Despite DD weapons completely obliterating Barriers, due to the long duration these weapons take to fire, you can continue to place barriers even in the presence of DD weapons. However, be sure to keep a deployable barrier when you see a DD weapon. Consecutive waves with DD weapons are generally quite rare (unless it's from 5-3 to 5-4), so after the DD weapon has been destroyed, or if you know that you can kill the entire invader before it activates again, you can resume putting barriers.

Keep in mind that quite a number of barrier ships are unable to fully utilize the inner lining of Barrier. I suggest taking a closer look at each barrier ship before coming to a conclusion whether the ship is actually good or not. Generally speaking, ships that are able to properly often utilize the inner lining are better survival ships.

In conclusion, Barrier looks like a very straightforward Aura to use (it sounds like just always deploy barriers upfield), but there are many complexities to it where if well optimized, can make Barrier users very powerful in survival. It is hard to advise on any hard and fast rule on how to use Barrier as a lot of it is based on feel and experience. Barrier is also effective against all kinds of bullets, particularly fast moving ones. For an average user however, it is usually slightly underpowered, especially in higher leagues where the bullet density is very high.

APEX 1: Reflector

  • Game Description: Laser reflect on the Barrier outer surface.
  • Numeric Interpretation: Laser will be reflected to invaders with 10 damage per second.
  • Score: 4.45 / 5
  • Ships with the APEX: Gorthaur (Beta), Heechi (Delta), Qhelqod (Gamma), Stinger (Epsilon), Tillat'Or (Gamma)

Editor: Inside the circle and outside the circle are simply two different worlds.

This apex causes any lasers that hit the outer edge of the outer barrier to reflect back to a random target, with a DPS of 20, similar to PS's Laser Reflection ult. Bear in mind that even though lasers are reflected, the barriers will still take damage from the lasers per normal, and the inner lining will also still fade as per normal if the outer barrier dies first.

This apex is a big game changer for many ships that are unable to handle daily mission types with lasers very well, or just have a lack of defence against lasers which puts them slightly further down in the Tier List. Obviously, any ship with this apex is now extremely capable of handling even the hardest laser missions. Because even the smallest barriers can reflect lasers, you can deploy a thick stack of small barriers, all around yourself in order to defend yourself against lasers. Each burst of lasers firing only have the capability to destroy one barrier since barriers have a Phase Out time. This makes for near infinite defence against lasers. Just beware that your thick stack of barriers will fade away after some time even though they are not taking damage, so deploy each barrier slowly after each other where possible (unless you are overflowing on particles).

The only issue now is bullets, which can quickly destroy your barriers since you no longer have the advantage of the ult, the inner lining which is supposed to provide more defence. However, the pure offensive power of laser reflection from these barriers decimates invaders so fast, you hardly need to contend with many bullets at all. Just be careful to conserve one deployable barrier at hand as barrier Phase Out is not entirely reliable in keeping lasers out. You can then deploy the barrier you at hand to defend yourself against any possible laser leak. Also, if you are out of barriers but still have the deployable barrier at hand, you can deploy the barrier at the last minute just before the lasers fire yet another round, since the smallest barriers can last one full burst of lasers.

Unlike PS, the area of laser catch is much wider with barrier. This usually makes for much larger reflection damage compared to PS since some T1 low Mk lasers that have poor tracking ability may not be able to target your core in time.

Because of the presence of DDLs in daily missions, you need to be careful to place barriers such that DDLs will not hit them, or reserve barriers at hand until one round of DDL has fired. Be sure to have a barrier up at the start of each wave as DDLs take very long to fire and one round of lasers is definite to go off first.

APEX 2: Reinforced Lining

  • Game Description: Increases strength of Inner Lining.
  • Numeric Interpretation: The inner lining of the barrier will have the same strength as the outer lining.
  • Score: 1.91 / 5
  • Ships with the APEX: Predator (Alpha), Razor VI (Beta)

Editor: Think about who you want to trap inside the circle.

This apex increases the strength of the Inner Lining, making it roughly the same strength as the outer barrier.

This apex improves the survivability of the ships that have it. But in addition to that, it allows for some chaining of offensive Zens, such as ML or MB. In fact, you may even be able to charge 2 of such Zens consecutively before the both the inner and outer barriers fade.