Teleport

Move from one place to another immediately.

Very straightforward Zen to use. The best Zen for beginner players as it is simply an escape tool. Fast cooldown also means it is highly abusable and easy to use, without too much worry of running into long charge times.

The details of this skill are listed as follows:

Level12345Ultimate
Charging Duration (s)0.80.70.60.50.40.4
Charge Time Increase (s)0.60.50.40.30.20.2
Charge Time Recovery (s)Fast (3.5)~~~~~
  • Ultimate: Arrival EMP, which produces a small BEMP of radius 50 immediately on arriving at your new location you tapped on. Note that the center of the Arrival EMP radius is with respect to the ship, and not the core, which means some TP ships are slightly disadvantaged in the fact their core is placed more forward in the Arrival EMP circle.
  • Score: 8.18 / 10
  • Useful Levels: 1, Ult
  • Priority Level: 7 / 8
  • Illustration:

Comments

  • Editor: Does the hand you raised hastily when facing the speed laser look like a French military salute?
  • ☀🐕: Great for survivability. But most TP ships are toys except Icarus. It’s a shame to see that Icarus becomes a toy too nowadays.

Usage

A level 1 TP can still be useful, however, you have to be very skilled to pull it off as you need a ton of pre-emption skills so that you can successfully charge a TP. No matter, being able to get yourself out from a massive barrage of bullets headed your way simply by TP-ing away is so useful and is life-saving in many circumstances, especially when faced with a thick advancing cloud of shurikens headed your way. As you upgrade TP, it becomes more and more responsive, thus being much easier to use.

Despite it being probably the most beginner Zen to use, it is not always easy to get into. For an absolute beginnner, even a sufficiently leveled TP may be an issue. Despite the fast charge time, many beginner players forget that there is still a charge time, and not negligible as well, requiring some degree of pre-emption. Not pre-empting when to TP may result in darts or boomerangs still killing you due to their speed. Another thing TP may throw players off is how TP-ing to your new location throws off your touch relative to the ship's core. This usually requires a very quick repositioning of your touch on screen in order to get comfortable with using the ship again.

Because it can be hard to pre-empt TP, and as a beginner usage, and TP is nothing more than an escape tool (this does also apply to pro players well when you get flooded very quickly from spinners and Bloomers), you should never position yourself at the bottom of the field. Leave at least about one ship's height worth of space between the bottom edge of the field and your core. This allows you to quickly swipe behind a bit and let go, so that TP can charge quite safely. However, try your best to be careful when you swipe behind as there can be many times you swipe behind and die from bullets behind.

The next step is to figure out the new position to go to. Without the ult upgrade, you will attempt to find for the cleanest spot, one that has the less amount of bullets around it to go to. But with the ult, everything changes. When faced with darts from all directions and thus being too difficult to inch your way left or right to avoid them, or if inching left or right is hindered by pellets or shurikens, one technique is to charge teleport knowing you are going to get trapped in between streams where there are these other bullets, and then TP-ing to the back end of all these streams to completely avoid the cluster of dart streams headed for you.

The most common technique for TP (only if you have ult) is to TP right onto MIRVs to completely delete them away. Take note that it is VERY difficult to eliminate a laser MIRV, although it is still possible, and you can do it somewhat consistently with enough practice with a specific TP ship. This is because the new arrival location must be right smack in the middle of the laser MIRV before it has any chance to trigger. The reason this works with pellet MIRVs is because the pellet MIRVs actually usually trigger , but the pellets that are released are the ones that get deleted, not the MIRV. This is why TP-ing slightly further away from an pellet MIRV still sees a few pellets being released.

When you TP to eliminate MIRVs, the most important thing to know is that, the best spot to TP to is not always the spot with the most number of MIRVs clustered together. This is because such a spot can be rather upfield, and there are other surrounding MIRVs around that cluster that will explode. This causes a total complete mess of pellets flying in all directions and thus, most likely resulting in your death, particularly from MIRVs that come from behind your core. Instead, it is a better idea to find a spot of MIRVs such that first, there are no MIRVs behind you that can trigger when you arrive to that location, or TP-ing to that location will not result in you pushing back down far enough to trigger the MIRVs behind you. Second priority is then finding the spot with the most MIRVs that can be deleted.

If you don't have an ult TP, you can try something else called "Implosive Grazing" where you teleport right into the very spot the MIRV exploded, but only after the MIRV has really exploded (because you can die by the MIRV itself as well). Bear in mind it only works if it is a lone MIRV and MIRVs that are very tightly clustered and you are sure every one of them has exploded. This technique is shown below:
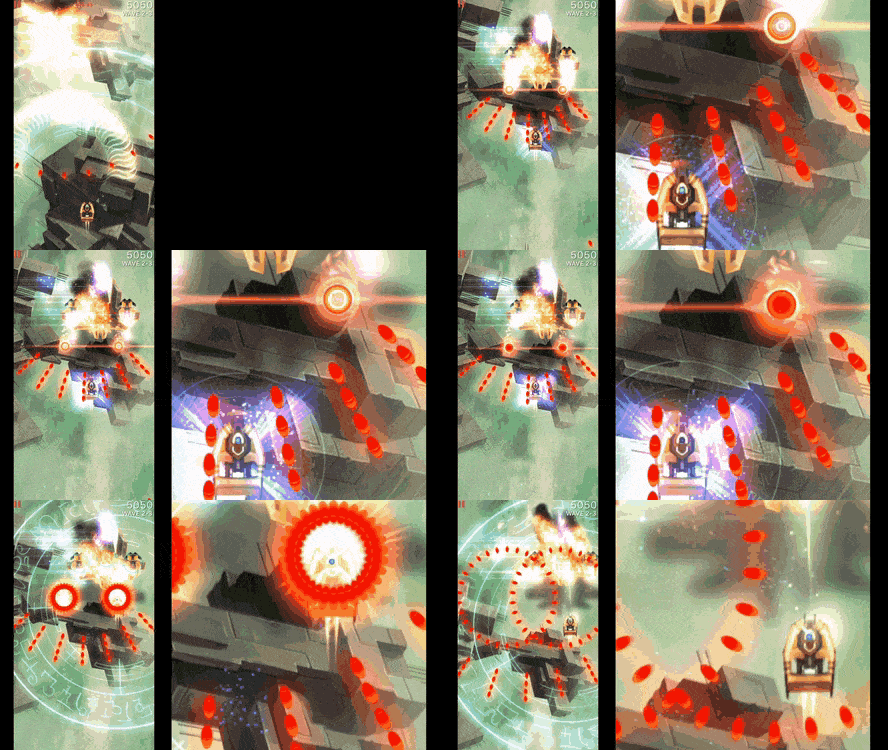
The other most common technique of TP against MIRVs, particularly those from MIRV Bloomers, is to TP to the frontline of MIRVs to delete as many as possible, and then push back to the bottom of the screen. Then repeat it again as needed, but be sure not to overabuse this technique as TP charge time can stack quite fast when doing this. You have to still ensure that the MIRV Bloomer is destroyed as soon as possible.

A great tactic to learn TP is to pre-charge it as early as possible, when you have the slightest chance of getting threatened. This allows you to drastically slow time, in fact, time slows down by 90% (10% of original gameplay speed), allowing you to carefully decide where to TP to. Bear in mind, however, you only have 7 seconds in real time to decide where to TP to. An interesting to note is that allowing TP to cancel does not increase its charge time. As you get better, the amount of pre-emption needed becomes less and less, and eventually, you learn to only use it when only seriously threatened, and pulling back a bit to charge it safely (or charging it at the right time with sufficient pre-emption if there is no space to pull back).

Now for a very general guide of where to TP to, is quite simply not a spot where it is too dense in bullets. So try not to TP in the middle of a shuriken cloud, because you'll very quickly get killed by the other faster bullets that may come for you. Another general tactic is to generally find a spot where there are less variety of bullets, and certainly, that variety does not include boomerangs. Preferably, it should be light clusters of shurikens as well as pellets. TP-ing to where darts are a dangerous and not recommended unless you can eliminate all of them and be sure no more are coming for you soon enough.

If the whole screen looks completely cluttered with bullets, the only best solution is to TP to the very top of the screen. However, make sure that there are no spinner bullets that are still up there when you do so. Once you do that, it's usually a good idea to swipe across the top of the screen, from left to right (or vice versa), unless there are extremely upfield Ravens or Sparrows that you may potentially collide into. This technique is extremely useful for backline Vultures. The swiping action is primarily a distraction, it attracts all dart tracking turrets towards you at the back of the screen and thus allows some time for the rest of the field to get rid of bullets. So what you want to do here is to swipe across, then let go, and let TP run until the dart tracking turrets start firing, or obviously, if any of the darts are already so close to killing you. It usually doesn't take long for them to achieve a lock-on, so there is no risk of TP cancelling. This dart distraction technique is very useful for many offensive TP ships as they can launch their offensive Aura immediately after the TP.

Now all that covers the defensive aspect of TP. TP is also a very useful positional tool for ships that have only straight firing weapons. Such ships utilize TP much more often than other ships that simply only use it for escape purposes. The idea is to use TP to quickly line yourself up with your next target after your current one you are aiming at is destroyed. For speedrunning, the degree of pre-emption needed differs by the speed of the straight firing main weapon. The slower the main weapon, the more pre-emption needed. For offensive radius based Auras, TP is also used as a "peek-a-boo!" What you want to do is to TP upfield, launch your Aura, and then slowly retreat back down. For counter based Auras, it is used to blitzkrieg, quickly getting to where you need and firing your Aura immediately after arrival. For this case, it becomes a very tactical gameplay, strategically sniping down targets.

APEX 1: Explosive Arrival

  • Game Description: Arrival EMP has been modulated to also deal damage to Invaders in its range.
  • Numeric Interpretation: Deals 30 damage to Invaders within a range of 50 from the arrival point.
  • Score: 4.27 / 5
  • Ships with the APEX: Barret (Epsilon), Czar (Lambda), Icarus (Sigma), Luna (Omega), Sakura (Phi), Xaniea (Lambda)

Editor: Slippers for stepping on cockroaches.

This apex does 30 damage in the Arrival EMP range of TP (not counting for armor damage reduction, if applicable).

This apex benefits all ships with it, no doubt, due to the additional form of damage that can now be dealt to invaders. However, it benefits some ships more than others. Particularly, it benefits ships that have a long recharge time between each burst, since explosive TP can be used to cover for periods of time where no damage is dealt, in order to finish off weakened invaders, instead of wasting their powerful main weapon burst just to finish off the job. It also benefits ships that suffer from invader crowds. As TP is the most abusable Zen with a non-zero charge increase time, it turns any ship with it into a speedrunning ship that can deal devastating AoE damage extremely frequently. It can even be used twice in a row without much implications, provided TP has cooled down. Even though the AoE may be small, you can pre-charge teleport and let it run until you find for the perfect opportunity where many invaders get together and BOOM, teleport on them to deal lots of damage. It's just like the Tele-frag technique.

APEX 2: Double Teleport

  • Game Description: Enables an instant charge for a second Teleport directly upon arrival.
  • Numeric Interpretation: The charging for the second Teleport will be completed instantly after the first one.
  • Score: 2.00 / 5
  • Ships with the APEX: Czar (Delta), Sakura (Epsilon), Trireme (Tau)

Editor: Don't worry, I'll just step on your foot and then leave, no other intention.

This apex allows you to immediately use TP again after you have arrived at your new location from the first TP, without incurring the increase in charge time for this second teleport. (Subsequent TPs will suffer the charge time increase though) However, the second teleport must be done immediately/near immediately after you complete the first teleport. There is only just enough time for you to use one counter of your Aura, fully release your Aura (for radius based Auras) or do a very brief swipe.

This apex is quite situational based on ship, but it has a generally somewhat useful purpose for all ships with this apex. It is useful against MIRVs, where you can eliminate much more MIRVs and bullets. It is also be useful for dart tracking turret distraction since these turrets don't fire until they achieve a very brief lock-on with your core, so simply teleport to a corner and wait for the dart turrets to track you and fire before using the 2nd TP.

It is also possible to abuse a technique known as Graze then Teleport. Basically, what you do is to purposely teleport into a dense cluster of bullets, let the second teleport charge run for a while, then just before a bullet can hit you, teleport out again. This results in massive grazing from the cluster of bullets around you. The usefulness of this depends on the ship that has this apex.

In daily missions, this apex can be useful in eliminating rogue clusters of bullets that are emitted by very low tier turrets in dense and/or heavy waves. The pure density of bullets also necessitate a need for more bullet clearing options.

APEX 3: Extended Clearance

  • Game Description: Energy from the Teleport is released on arrival to extended the range of the Arrival EMP.
  • Numeric Interpretation: The clearing space increases from 50 to 80.
  • Score: 1.55 / 5
  • Ships with the APEX: Aurora (Lambda), Claymore (Delta), Orion (Lambda), Prime X (Tau), Tillat'Or (Epsilon), Vani-Vith (Sigma)

Editor: I'll step on you, but don't step on me.

This apex increases the Arrival EMP range of Teleport by 30% to a radius of 65 compared to 50 for normal Arrival EMP, as shown in the screenshots below, with normal TP Arrival EMP range on the left, and Extended Clearance TP Arrival EMP range on the right.

This apex is useful in MIRV/Shuriken missions, particularly, when employing the TP then pushback strategy. The increased clearance in space makes it easier for you to pushback, especially when faced with shuriken clouds hindering your pushback. Other than that however, the buff provided by this apex is hardly felt in other mission types.

APEX 4: Departure EMP

  • Game Description: Residual energy is converted to a Bullet EMP on the location the ship teleports away from.
  • Numeric Interpretation: A Bullet EMP of range 80 will be activated at the starting point when using Teleport.
  • Score: 1.00 / 5
  • Ships with the APEX: Hunter (Alpha)

Editor: I've already escaped, why should I care about what happens in the original spot?

To be honest, the bonus of this APEX is somewhat difficult to understand because it releases a Bullet EMP at the departure point. The only plausible explanation is that if you just teleport to a nearby location, the effects of the Bullet EMP from departure and arrival points can overlap to eliminate more bullets. However, bullet clearing can be achieved by using the Phalanx as bulldozer. If you find yourself needing to combine the departure and arrival Bullet EMPs, it means you're already in a very dangerous situation. Consider optimizing your strategy.

APEX 5: Darkfire Blast

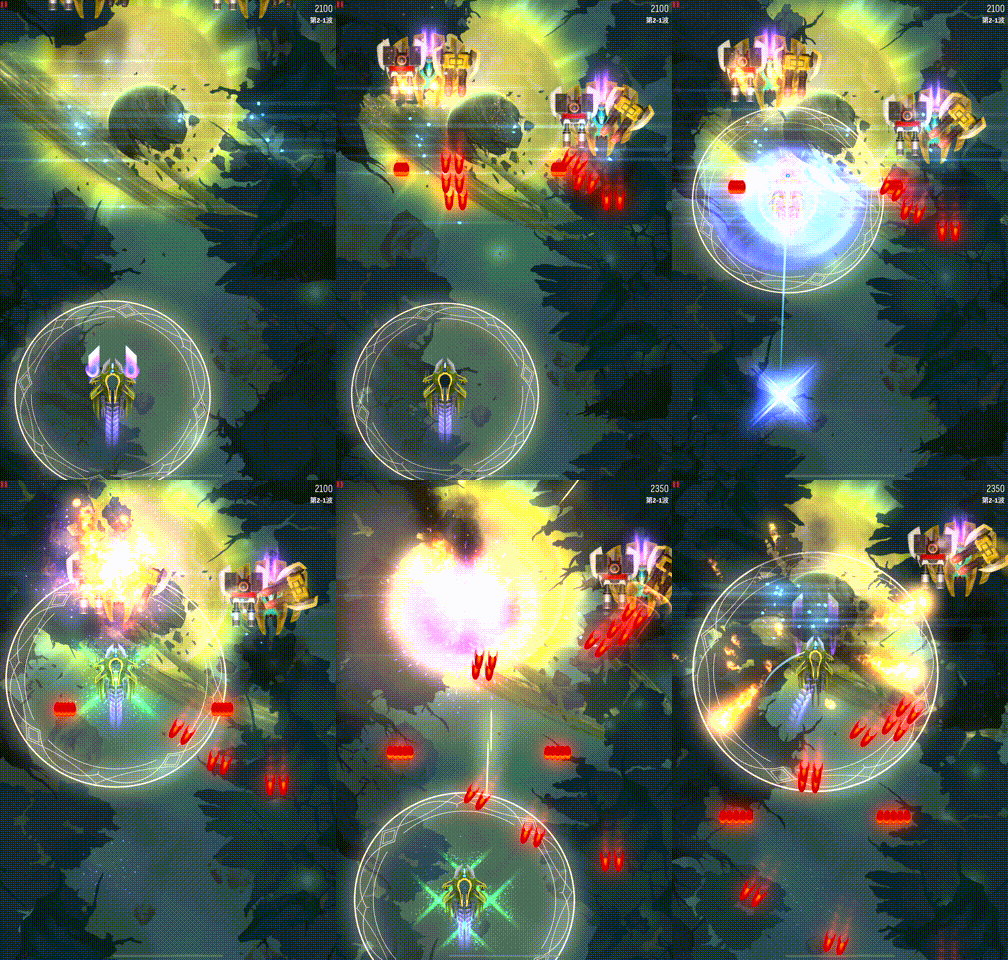
  • Game Description: The Darkfire shot upon Teleport arrrival now deals blast damage.
  • Numeric Interpretation: The Darkfire shot deals an AOE damage of range 100.
  • Score: 2.55 / 5
  • Ships with the APEX: Trinity (Delta)
  • Illustration: This is the base effect, and the APEX will change the damage to AOE damage.
Editor: A moderate-range explosive attack.

The Blackfire of Trinity becomes area damage, which brings about a technical demand for the ship. This enhancement is better than the effect of another APEX of Trinity. As a survival-oriented ship, it doesn't need to be close to invaders for output, so it can entirely opt for upgrading its output. In terms of usage, use teleportation as an offensive tactic as much as possible. Release the Blackfire in the middle of dense enemy groups to cause more damage and save its lackluster main weapon output.