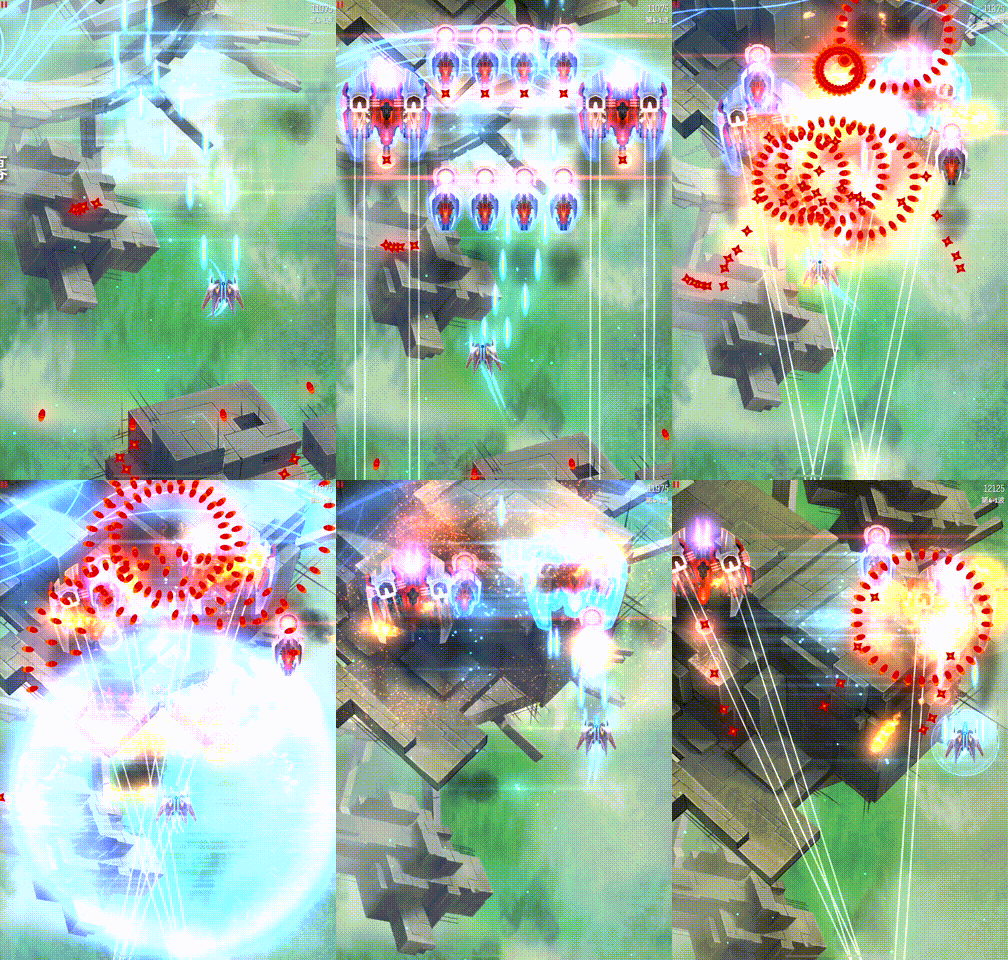
Bullet EMP

Releases an EMP that clears all bullets within range.

The best beginner's tool of survival. Can be used offensively to some extent, but mostly defensive.

The details of this skill are listed as follows:

Level12345Ultimate
Max Radius250300350400450450
  • Ultimate: Stuns turrets in its radius for a maximum of 0.6s.
  • Score: 8.36 / 10
  • Useful Levels: All, Especially Ult
  • Priority Level: 4 / 8
  • Illustration:

Comments

  • Editor: Just stop wasting efforts, shurikens.
  • ☀🐕: Default BEMP should be made to deal 10 damage since it’s not a powerful Aura anyway. A buff like this will make Aurora more playable. Destructive Wave Apex should be made to deal higher damage accordingly.

Usage

Arguably, BEMP is probably the most useful Aura even at Level 1. It is thus usually recommended to upgrade your Zen first if a ship has BEMP. An upgrade in BEMP only increases it's maximum size. The smallest BEMPs can save you from death. This is coupled with the fact that the automatic regeneration of BEMP is enough for it to be used again. Since you would be usually cornered by bullets before your supposed death, the proximity with the bullets as you retreat is close enough for you to graze off them, and thus increase BEMP radius a bit more, and being a bit more useful in clearing a small enough space to wiggle your way out of tight situations. Used in small amounts, BEMP is almost able to infinitely save your life if you are more of a dodger that can dodge your way out of a bullet hell. BEMP becomes more of a second chance, which you can almost infinitely abuse at times.

Upgrading BEMP level by level does have a noticeable effect however, as the radius of BEMP increases faster even with the same amount of particles. At lower levels, BEMP is purely a defensive tool. With higher levels however, BEMP becomes more than that. It is also a re-positioning tool for offensive ships equipped with BEMP. Indirectly, BEMP helps out in damaging invaders since you can then aim your weapon straight at the invaders instead of potentially missing and wasting DPS.

BEMP is a universal bullet clearing tool, it doesn't quite have a weakness to any type of bullets, except for maybe boomerangs since mis-firing BEMP at the wrong time can miss a few incoming boomerangs. It is usually very powerful against pellet and dart spinners since you would rapidly graze off them, resulting in Aura gains and being able to hop across lanes after a very short time to avoid other bullets coming in that lane you are in. One weakness of BEMP is that it is a one-time usage, expanding it leaves you vulnerable in the next round of bullets. However, destroying invaders fast enough gives you particles to refill BEMP very quickly, thus being able to launch more decently sized BEMPs. Remember, the smallest BEMPs help!

The Ult is a game changer for BEMP. A 0.6s stun duration doesn't seem like much, but the duration is not what you are looking at. It is the very fact it stuns in the first place that works so well. This works to reset deadly spinners, MIRV Bloomers, lasers and DD Weapons, and delay them from firing, leaving you more space to move around with less bullets being pumped onto the field, or lasers to cut you off into a corner. This allows you to buy more time for you to destroy them. The huge radius also allows you to go on the offense and line yourself up with these dangerous turrets to take them out quickly. The additional useful fact of BEMP is that it slows down time briefly when the Aura is expanded (the bigger Aura, the more slowed time you have, obviously), allowing you to move yourself in place. Alternatively, the stun time can be enough for you to charge up an offensive Zen. Bear in mind that it is mostly a one time reset, so you still need to act fast to take out these turrets, unless there are enough smaller invaders around to feed your Aura. This turns BEMP into a versatile offence and defence tool.

It is much better to use BEMP pre-emptively, instead of doing the standard retreat until you are cornered strategy. This is because BEMP is a 360° Aura, and using it further back wastes the 180° behind you, clearing less bullets than optimal. When you know that you are going to be cornered, use BEMP immediately. When you have decided it is time to use BEMP, try your best to make a sudden jerk forward as much as you can (be careful not to crash into bullets, do however much you are comfortable with) and then fire BEMP. Using it as forward as you can also allows you retreat space afterwards, which is always useful.

Unfortunately, BEMP also comes with its disadvantages. For one, it could not directly deal against lasers. The reset only works one time most of the time since the second BEMP would usually not be big enough to cover all lasers on field. This means a problem against fast tracking lasers, and there can be multiple of them scattered in different parts of the playing field. The reset also works to your disadvantage for certain turrets. For T1 and T2 dart tracking turrets, it can cause them to shoot randomly after they are being free of the stun, causing a mess of bullets on field. Couple that with T3 and T4 dart tracking turrets that also flood the field again quickly, it can sometimes be a problem. The same goes with pellet spread turrets, particularly when they are hit with your BEMP during their cooldown period. However, since pellets take some time to reach you, and T1 and T2 dart turrets are not too dangerous in bullet flooding, it is usually not too much of an issue. The biggest issue comes with boomerang turrets, particularly high tier ones, since they will flood you with boomerangs immediately after being free of the stun, leaving you little time to react, especially with the combination of the other bullets previously mentioned.

BEMP will usually start to struggle a bit against heavy waves. You will need to find ways to graze off other bullets, such as darts or even pellets. Against higher rank daily missions, BEMP can be difficult to sustain due to how heavy and dense waves can get. As a pure defensive tool, you must quickly work to eliminate enough invaders to create enough breathing space for yourself before you get cornered with the tiniest BEMPs which can be difficult to save you, especially in Marshal missions when the bullets get really messy and come in fast.

APEX 1: Destructive Wave

  • Game Description: An Enhanced Bullet EMP that also deals damage to Invaders.
  • Numeric Interpretation: Bullet EMP deals at most 10 damage to invaders within range.
  • Score: 4.64 / 5
  • Ships with the APEX: Juggernaut (Lambda), Lyova (Tau), Phoenix (Delta), Shinova (Delta)

Editor: A qualitative improvement, capable of both offense and defense. When facing shielded invaders, remember to break the shield first before using the aura.

This Apex deals a maximum damage of 10 to all invaders that are within range of the BEMP when fired. The damage scales with radius, just like SEMP.

This apex is extremely useful under all circumstances. This is because there are times when you are sometimes hanging around with a near full size BEMP and just don't know what to do with it, since the remaining turrets on field producing bullets are so easy to dodge. The AoE damage from this apex also potentially means you can deal massive damage to invader crowds. Particularly, when there are many Sparrows, you can instant kill them all and refill your BEMP to full size again and launch a second round, dealing even more damage. With many Ravens on field, they can also be killed even more quickly and thus killing just a few Ravens (4 is actually more than enough) can re-charge your BEMP to full size again for a second round if deemed appropriate. In fact, this apex turns many ships into pretty insane potential speedrunners, even for those ships that were originally nowhere near speedrunning standards. This apex turns BEMP into such a versatile tool - one that does everything imaginable - clearing bullets, resetting turrets (sometimes a full SEMP duration is not necessary, particularly for spinners and lasers), and dealing damage. It's triple treat!

APEX 2: Extended Range

  • Game Description: Amplifiers give Bullet EMP more range.
  • Numeric Interpretation: The max radius increases from 450 to 500.
  • Score: 2.18 / 5
  • Ships with the APEX: Mirage (Delta), Shinova (Alpha), Tempest (Beta)

Editor: Stretching your hand a bit, but it seems like it hasn't actually stretched.

This apex increases the maximum radius of BEMP from 450 to 500. The energy requirement to reach the new maximum radius is the same, which translates to a quicker increase in BEMP radius.

This apex is quite useful for the quicker increase in radius. This means that you can get a roughly usable BEMP with less particle uptake. It can be a big deal for offensive ships that rely on BEMP for positioning purposes. The other advantage of this apex is needing less particles to have a big size BEMP means it's faster to get a big enough BEMP for it to cover dangerous turrets such as spinners or MIRV Bloomers, which can make all the difference in survivability. However, remember that with this apex, you should generally use BEMP more often as the maximum of this extended range BEMP is quite useless honestly.

Because of how plentiful particles are in daily missions from dense waves, the small increase in range generally doesn't do much.

APEX 3: Increased Stun

  • Game Description: Expert tunning slightly increases the stun duration.
  • Numeric Interpretation: The max stun time increases from 0.6s to 1.2s.
  • Score: 1.70 / 5
  • Ships with the APEX: Mirage (Omega)

Editor: What can you do with the extra 0.6 seconds? Perhaps offer a friendly greeting while charging up.

Increasing the stun duration doesn't bring about many changes. 0.6 seconds means that the stun merely serves as a reset, allowing you to refocus and face the enemy's attack again. Doubling it might mislead you into thinking there's plenty of time left for stunning, causing you to pause and charge up Zen. Another issue is that this APEX is only equipped on the Mirage (Nightfury Laser), and the Nightfury Laser is notorious for its long charging time. Although the stun duration is increased, it may still not be enough time for you to charge up the laser again before it cools down. Lastly, the price of 50,000 is simply too expensive; you might not even consider purchasing it solely for this skill.

APEX 4: Bullet Detonator

  • Game Description: Enemy bullets are detonated dealing Blast damage.
  • Numeric Interpretation: Each detonated bullet deals 2 AOE damage.
  • Score: 4.27 / 5
  • Ships with the APEX: Disaris (Omega)

Editor: Playing games for so long just for this moment of excitement.

Transplanting the Bullet Detonators of Point Defense onto the Bullet EMP is truly a genius idea. This APEX greatly enhances the entertainment value of Disaris, giving it a chance to compete with veteran speedrun ships in MIRV Spam missions. Typically, in missions, you need to wait until the bullets cover the invaders before decisively using the Bullet EMP to cause widespread damage. In other words, as an offensive measure, the best use is to dive into the bullets, clearing all bullets when your ship is almost surrounded by bullets. One successful aspect of this APEX is that the main weapon used in conjunction is fully guided, meaning your attention doesn't need to be focused on aiming the main weapon, allowing you to allocate more attention to the timing of using the Bullet EMP. Finally, because the entertainment value of this APEX outweighs its practicality and it costs 50,000 credits, careful consideration is still needed before obtaining it.