
Reflex EMP

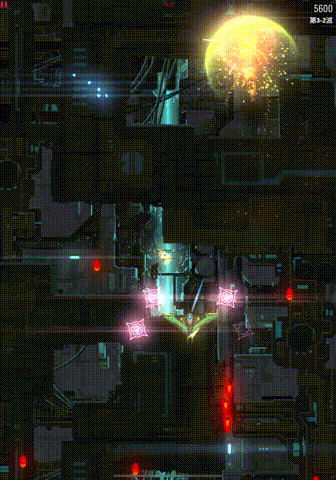
Activate an EMP that clear all the bullets within range.

One of the hardest defensive Zens to use. A versatile defense and offense tool once ult. Slow cooldown means it is difficult to grasp the appropriate interval between use, thus only recommended for pro players. The concept of leaving yourself exposed to incoming fire even for a short while is also not intuitive for lower skilled players.

The details of this skill are listed as follows:

Level12345Ultimate
Radius225~~~~~
Charging Duration (s)1.00.90.80.70.60.6
Charge Time Increase (s)3.02.752.52.2522
Charge Time Recovery (s)Slow (6.5)~~~~~
  • Ultimate: Deals 20 AoE damage to any invaders within the REMP.
  • Score: 9.09 / 10
  • Useful Levels: 1, Approximately 3-5, Ult
  • Priority Level: 5 / 8
  • Illustration: The first one shows how to clear bullets; The second one shows how to use it to deal damage.

Comments

  • Editor: There will always be times when you need to survive the bullet hellspawn.
  • ☀🐕: The most powerful Zen. It’s versatile and has a low charge time, making it viable in all mission types.

Usage

A level 1 REMP is almost useless because the 1s of charging time is just way too long and requires too much pre-emption. That is not to say it is completely useless, as the radius of bullet clearing for REMP is pretty decent, and allows you to hop across quite a fair bit of screen space. This can be especially useful when dealing with spinners, as they create lanes of bullets that are too difficult to jump across normally. As you upgrade REMP, the level of pre-emption needed becomes less and less, thus becoming more and more useful since the lesser pre-emption also means you need to retreat less. This translates to more bullet clearing since you launch REMP closer to the center of the screen.

Because of the significant noticeable charge time of REMP, it is sometimes not intuitive for newer players since they tend to only think of their bullet clearing options only when extremely threatened, and when that happens, the charge time of REMP, even at max level, is too long. Thus, it might be a better idea to learn a Zen with a lower charge duration (which is TP) first before learning REMP. The other thing about REMP that is difficult to learn is the cooldown time of REMP. The slow rate of recovery means that many lower skilled players will usually attempt to use them again before it has completely cooled down. It takes ≈6s for REMP to cool down. To put that in perspective, it's usually once a wave Act 4 and above in community missions or once every heavy and/or dense wave in daily missions, although sometimes it is possible to use it twice a wave in Act 5 and above in community missions or once every heavy and/or dense wave in daily missions, only if there are sufficient larger invaders such as Vultures coupled with at least 2 Eagles.

The bullet clearing aspect, however, is not the main selling point of REMP. Once you upgrade to ult, REMP's utility is significantly improved, adding a completely new dimension to using REMP. REMP is now a very pre-emptive tool in clearing out invaders, before they get the chance to flood the field. In particular, many waves, Act 4 and above are opened up by an REMP, which means you need to position yourself at that position to REMP before the invaders of the next wave comes in. The huge advantage to REMP is how quickly it goes off, unlike MB. In fact, REMP is actually a psuedo-MB, albeit with a smaller radius and less damage, but still, an extremely useful AoE damage means to deal devastating damage among crowds.

REMP is also the most effective solution against Sparrows equipped with MIRV Deathonators, discounting apexes (as Destructive BEMP works even better). Simply go right into the middle of them and launch an REMP, and poof, all or almost all the Sparrows will be gone and there'll be no pellets from MIRV Deathonators to deal with. However, only use REMP if it is densely populated with Sparrows. Do not use it if the wave is light and not dense enough with Sparrows, since the next wave might require it more, or feature a denser Sparrow crowd.

There is a very small chance that REMP will not be able to eliminate the pellets released by MIRV Deathonators, if the REMP is released too early as shown below in slow motion:

The unfortunate thing about REMP however, is while it is quick, it is not immediate. This means that learning the 0.6s timing of REMP is extremely important, since it can make all the difference in dying or missing it completely due to the invaders not being fully on screen yet. This, is one of the hardest parts of REMP to learn, making REMP a very high skill Zen which is not suitable for beginners. The rough timing for REMP between Act transitions is slightly after the words fully exit the screen (assuming Sparrows and Ravens coming in first).

The most optimal REMP usage is to be as brave as possible, pushing yourself all the way to slightly above the midfield to reach all the upfield invaders with its relatively small radius. It is not very small by any means, but it requires you to push up high to make use of it. However, for a player new to using an ult REMP, it is suggested you start opening up REMPs at the lower half of the screen, progressively learning its timing and then slowly pushing it up higher and higher.

That is not to say it is always optimal to use REMP upfield. Knowledge of the waves is key in determining the optimum REMP position. You want to find an area of the field with the largest concentration of Ravens and Sparrows to pull off REMP and be in the middle of all of them. This is not always possible due to the presence of dart tracking turrets. In this case, you either want to be completely above the Ravens and then quickly swipe to either end of the scene to escape their darts, or you have to settle with a less optimal REMP that you would pull off closer to one side of the field (at about the quarter mark).

Even if the field has no Ravens, you should always pull off an REMP each wave in Act 4, and there is no reason not to with a wave with only larger invaders (Herons and above) because there is too much time for REMP to cool down in that larger wave. This does not mean you should use REMP twice that wave however.

For Act 1, REMP can be used only once, and usually it is used in 1-1. For Act 2 & 3, it can depend on wave composition but twice is a good guide. From Act 4 onwards, once per wave. There are times in Act 5 here twice a wave might be even possible. The important thing is not to allow REMP to have a significantly long charge time of approximately above 1s. There are rare times, however, where chaining REMP almost immediately after one another is actually optimal. An example might be to open up wave 4 of a certain Act with REMP, clearing that wave quickly, but wave 1 of the next Act is also optimal for another REMP to go off. Because REMP clears off wave 4 of that Act quickly, there shouldn't be much bullets to contend with. You can then do a quick delay by drawing a quick small circle and then leaving REMP to slowly charge during the Act transition and when the wave of the next Act arrives, boom, REMP goes off nicely. With Act 4 or 5, this can sometimes even mean that overheating REMP twice in a row in such circumstances still allow for REMP to go off comfortably in wave 2 of Act 4 or 5.

In very dense or heavy waves, it is usually difficult to go all the way deep into invader lines to release an REMP. This is especially since when it is very easy to either crash into the stray bullets they fire, or run a great risk of colliding into a turret's hitbox. A slightly below the centerline REMP is generally sufficient, but go for the middle of the field if you can. In a pure Sparrow wave, a mid field REMP will do wonders to eliminate all those pesky dart streamer or laser Sparrows. In daily mission of heavy waves, if it's Act 4 or above, you can sometimes even pull off a defensive REMP after the initial REMP to deal damage.

For some ships, the extreme optimization of REMP is less stressful, being able to position yourself at that spot much earlier and not potentially wasting too much DPS from your main. For other ships with slow travelling projectiles however, the optimization is much more difficult and you have to throw yourself into that position, meaning you let go of your touch and literally flick your touch to that spot, which allows for a small amount of movement while REMP begins to charge.

While using REMP for damage becomes the primary purpose of REMP when ult, do not be afraid to use REMP for defence as already detailed above. Survival is always more important than going for the offense.

APEX 1: High Damage

  • Game Description: Energy actuators increase the damage of the EMP.
  • Numeric Interpretation: The damage increases from 20 to 30.
  • Score: 4.91 / 5
  • Ships with the APEX: AB8/Klyn (Sigma), Jeria (Sigma), Lyova (Lambda), Predator (Delta), Shogun (Sigma), Starless (Sigma)

Editor: Bringing about qualitative change in reflect damage, even rivaling Mega Bombs.

This apex increases the AoE damage of REMP from 20 to 30.

This apex is very useful under almost all circumstances. A damage of 30 means that REMP now instantly kills Hull Ravens, making all ships with this apex very viable for Hull missions, even for ships that were not originally designed for Hull missions. However, this apex also heavily damages Armor and Shield Ravens, rendering them extremely vulnerable to just a few more projectiles of your main weapon (or just a bit more exposure to a beam weapon). This means that pesky Ravens hiding behind a Vulture can be taken out very quickly, even before the frontline Vulture's turrets start to wreck havoc from say, its spinner turrets. But even tracking turrets usually don't have enough time to flood the upfield, and you can often head back down safely through the extreme side of the field. Furthermore, with the same AoE radius, and a pretty significant buff to the damage, the increase in total damage being dealt to invaders with a correctly launched REMP is huge.

Using this apex in daily missions is a huge joy, especially when faced with dense waves. The satisfying compounded sound of the REMP dealing damage to the gazillion invaders on field either completely obliterates Unprotected Ravens or severely damages other affinities of Ravens, leaving them so vulnerable to the slightest touch of an offensive Aura or your main weapon. The increase in overall damage dealt is enormous compared to a normal REMP, making any such ship with this apex a tremendous boost over its base form.

Just bear in mind that there are still rare occasions where if deemed necessary, you need to use REMP purely as defence. Don't be too uptight about using REMP for damage. However, these occasions are now even rarer since you deal so much initial damage that you clear off a wave significantly faster than normal REMP.

APEX 2: Extended Range

  • Game Description: Improved amplifiers increase the EMP range.
  • Numeric Interpretation: The max range increases from 225 to 280.
  • Score: 3.00 / 5
  • Ships with the APEX: Nimbus (Epsilon), Saber (Epsilon), Scuuxun (Tau), UHB (Epsilon), Zimitr (Epsilon)

Editor: Do you feel like no matter how hard you try, you just can't figure out how to reflect the invaders back to you?

This apex increases the range of REMP by 25%. Damage is unchanged.

This apex is generally useful since you can potentially deal damage to some invaders that are normally outside the normal REMP range. It is also a defensive buff since more bullets are cleared, which is definitely a welcome addition. However, it benefits some ships more than others. Ships that have difficult main weapon aiming benefit more, like those with a narrow range cone and those with no to little weapon homing capability. This is because you need to push yourself upfield less to deal the same amount of AoE damage as normal REMP. Ultimately, this translates to you being able to go back down the bottom of the field after launching REMP for damage much more quickly, and thus, potentially have less wasted DPS from your projectiles or main weapon being unable to hit invaders on your way back down.

In daily missions, the extended range catches more invaders, especially when going upfield can be dangerous. It also enables you to deal against the insane onslaught of bullets in higher rank missions, particularly, catching rogue bullets that are fired by low tier turrets in dense and/or heavy waves.

APEX 3: Serenity

  • Game Description: Reflex EMP is triggered manually with increased range.
  • Numeric Interpretation: The max range increases from 225 to 280, but you need another click to activate it.
  • Score: 1.55 / 5
  • Ships with the APEX: Yigothu (Omega)

Editor: Switching from automatic transmission to manual transmission, anyone who has been to driving school knows how difficult it can be.

Building upon the extended range, this APEX allows the Reflex EMP to be manually triggered like a Mega Bomb. This is essentially a negative addition because manual triggering requires more operations, unlike the original Reflex EMP which only requires finding the right position and releasing to reflect. In critical situations, increased operations bring greater risks. For Yigothu, this APEX is completely unnecessary because the Chrono Field itself provides sufficient defense; there is simply no need to suffer the disadvantage of manual triggering for a little extra reflection range.