
Tempest

It's hail from the tempest, so no problem, right?

Basic Info

  • No: 9
  • Ship: Tempest
  • Affinity: High Impact
  • Type: Lightfury
  • Main Weapon: Ion Crystallizer
  • Aura: Bullet EMP
  • Zen: Mega Laser
  • Rarity: Common
  • Price: 500
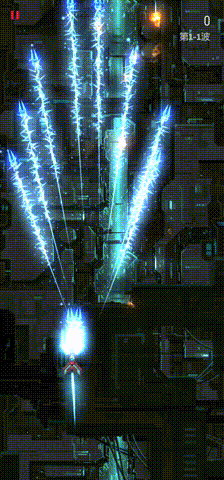
  • Main Description: Fast diverging projectiles that are slightly tracking when fired, fired in a general forward direction.
  • Upgrade Info:
Level12345Ult
DPS27.5028.8830.2531.6333.0034.38
  • Test Results:
MainAuraZenSurvivalSurvival TierSpeedrunSpeedrun TierFunFun Tier
81.82100.3690.5538.73A-26.73B-26.73C
APEX1APEX2Base ScoreBase RankLow ScoreHi ScoreApex RankFinal ScoreFinalRank
40.7334.91272.7337307.64313.4551405.6455
  • Main Weapon Illustration:

Survival

  • Tempest relies a lot on its pure firepower, both from its main weapon and its ML. Try your best to go up to the invaders' face to blast your main weapon on them. Retreat where necessary.
  • Tempest has a slightly tracking main where the projectiles have a small angular range which attempts to be fired at an angle that will likely hit an invader. Note that the projectiles themselves do not home once fired.
  • Once the first ML fires, eliminate the frontline invaders and accumulate a full BEMP. If there are still larger invaders, Heron or above, on the other side of the field, launch your BEMP upfield, and head back down to charge a second ML.
  • When launching your BEMP upfield to head back down for a second charge, try to be brave and quickly push to the other side with invaders. There will likely be MIRVs on that side, but doing it quick will not allow the pellets to spread out quickly enough to hit you when you launch BEMP somewhere around the mid-line of the field.
  • Otherwise if it's just smaller invaders left, launch BEMP where appropriate and kill off the rest of the wave.
  • Medium waves generally only require one ML. Do not use ML on light waves. Heavy and/or dense waves requires 2 MLs. For the heaviest and densest of waves, sometimes even up to 4 MLs is possible, particularly if you are talking about the final wave 5-4 of Marshal rank missions.

Speedrun

  • Going close up with a highly damaging main allows you to deal respectable damage to invaders.
  • The reliability of setting up ML after a BEMP means you can pull off a lot of MLs.

Fun

  • A pretty satisfying main, and actually quite easy to use. Also they really do sound like crystals hitting something.
  • The ML and then rush forward playstyle to launch BEMP is very fun.
  • It's very fun to be able to simply pull off ML after ML.

Trivia

  • Tempest main weapon, Ion Crystallizer appears to fire mini-versions of itself.
  • Tempest is one of the 3 starter ships you can get from your first warp gate activation.
  • Tempest is the only base ship with a spread main that has slight tracking capabilities. This discounts Exarch Omega.

APEX 1

  • Name: Focused Beam
  • Type: Zen
  • Description: Mega Laser power is concentrated in a smaller beam and deals more damage.
  • Interpretation: The width decreased from 150% to 50%, the damage increased from 170 to 200.
  • Form: Delta
  • Price: 20000
  • Score: 2.55 / 5

Tempest benefits massively from the thin ML, as riding up the ML is able to gain you massive Aura to almost completely refill BEMP. This aids the exit of ML even though you may have exhausted your BEMP to charge ML in the first place. This allows you to successfully execute the process of BEMP, ML, BEMP, ML, BEMP with little difficulty. In other words, there is little difficulty pulling off ML twice in a row. However, riding up the thin ML requires very high skill. You need to be extremely careful in doing so, so keep very careful watch of where you are going. This is unlike normal ML where the width is big enough you don’t have to care where you are going when riding the ML. Mastered well, this ML riding technique is very fun to pull off. 5-4 is an extremely good example of how the thin ML grazing works out so well.

APEX 2

  • Name: Extended Range
  • Type: Aura
  • Description: Amplifiers give Bullet EMP more range.
  • Interpretation: The max radius increases from 450 to 500.
  • Form: Beta
  • Price: 10000
  • Score: 2.18 / 5

The extra BEMP range gained, even just by grazing or collecting a few particles more can make all the difference in extending your safety range by a tiny bit. This can make a huge difference in whether or not you can pull off an extra ML charge, especially when dealing against very heavy or dense waves where multiple ML charges are needed that wave to clear most of the threats before the MIRVs start exploding in your face without an Aura refill option. Even when that happens, the faster increase in range is able to save you from death just by grazing and spam tapping in desperate hope of survival, which is very possible if you know how to weave between bullets a fair bit.

Video Illustration